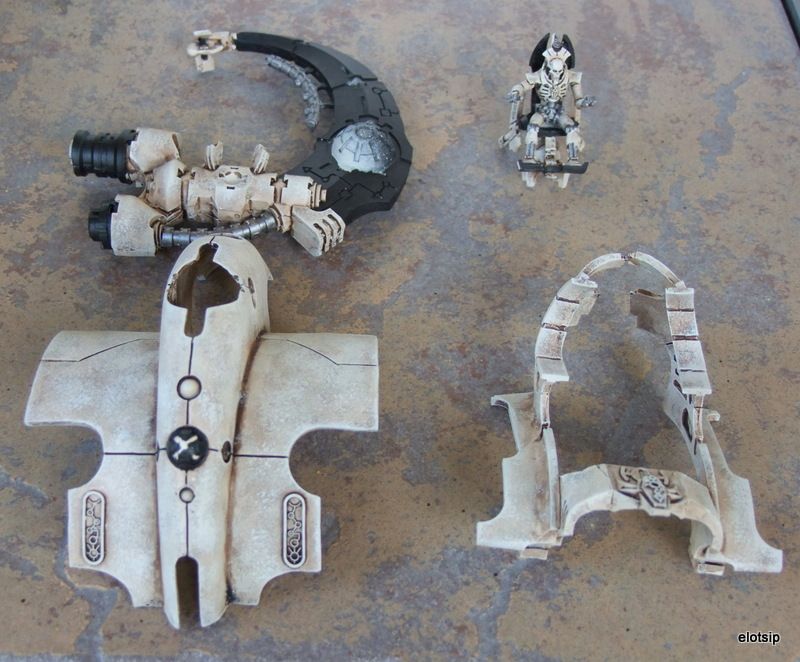
I've found that its much easier to paint the necrons before they are fully assembled so that's what I'm doing here. I put as much of it together as I can with respect to which pieces will be which colours. Then I get them painted and then do final assembly. Its a good way to keep myself motivated to finish them so I can actually use the models. :)


please can you give us some steps on how you dod this amazing paint job, would love to get mine looking like that.
ReplyDeleteI will write up the process I follow for the bone in a couple of days. Thanks for the kind words.
ReplyDeleteThis comment has been removed by the author.
ReplyDeletethank you, it really is something new for the necrons, i see so many that are just boltgun it pains me to do the same with mine, but i cant think of something that i think would fit, till seeing this i had lost hope for doing something new that i feel would suit, this look is perfect, great job.
ReplyDeleteI know what you mean. I tried many different paint schemes trying to come up with some that was somewhat unique, not too terrible difficult or boring to paint and that looked good to me. After several failed starts I decided on this scheme. I like the bone look to represent their undead nature, the metallics to represent the robotic aspect and the black/green to represent the scifi/space aspect. Over all I think it all fits together well visually I have not been able to paint any recently though. I am so close to getting the army completely done but I've lost my painting time so not sure when I will be able to get back to it.
ReplyDeleteI'll go over the process I follow for the bone:
1. I prime the entire model black.
2. I then spray a bone color that I got at Home Depot over all the parts I want that color. For big models I paint them pieces prior to assembly to make it go faster or I mask off the items I dont want to spray bone so that I dont have to go back and repaint the black parts.
3. Next I wash all the bone parts in a heavy wash of the aggarthrax (or however you spell it) earth GW wash. I put this wash on fairly heavily and unevenly.
4. After the wash is completely dry, usually I wait 24 hours, I start the sponging process.
5. The sponging process is actually very easy once you get it down. I use the left over foam pieces from GW cases, battle foam cases or any other foam I can find. I start with a bleached bone/tan mix. I dab the spong into the paint. Then I dab it onto a paper towel to get the excess paint off. Then I dab it all over the part I previously washed.
6. Once I have covered the entire area with this color I repeat step 5 but with pure bleached bone. Then a bleached bone/white mix and finally pure white. Each layer is a little lighter so that by the time you get to white there should only be a few raised edges where the pure white shows up. And thats it. Just dab on the colours with the sponge until it looks good.
7. If you accidentally sponge on too much of a lighter color you can go back and sponge on a darker brown in that area and then lighter it up just as you would the regular areas. I had to do this several times.
8. Its a good idea to seal this area once completed because it will be very porous and absorb other paints and ink easily. I failed to do this on some and the ink would just soak in and expand and i had to go back to clean it up.
I hope that makes sense. If you have any questions ping me and I will do my best to answer them. When you get some painted up shoot me a link so I can check them out.
Oh, I should add that I went back and add more wash in certain places at times. Usually this was along a ridge where two sections met, or in a crease, somewhere that would tend to be darker or collect dirt and grim. Do it sparingly so you don't dark the other areas.
ReplyDeletefantastic info, thank you so much, im going to give it a go over the next few days all being well, i hope you get your painting time back so so you can get your army all up and running.
ReplyDelete